Monday, December 7, 2015

Winter Art Fair and Instagram

Good Monday Morning

to all of my "maker" friends!

I had so much fun working on a variety of new art

for the local market.

So I thought I would share a few photos.


Pin It!


These days when I am so busy painting

I don't have as much time to post on my blog.
Pin It!

I find I post more often on instagram.

Would love to have you join me there @debhrabik


Pin It!

Have a happy week,

Deb


sharing at:

Saturday, November 21, 2015

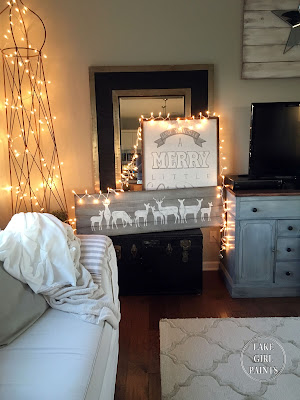
Planked Wood Art - Reindeer Row

I have some new winter art

to share with you all today!

A silhouette row of deer in gray and white

is something you can put on your wall

in winter

or really anytime.


The boards I used are "saw tex" fence pickets

that I bought at Menards.

They are not as heavy as the cedar fence boards.

They are approximately 3.5" wide, 3/8" thick, and 6' long

and are about $1.00 each.

I cut 4 boards 52" long,

connected them with 4 boards on back,

making the entire piece about 14.5" x 52".


I designed my layout in photoshop,

creating and combining different deer shapes
 

until I got the look I wanted.

After printing my design,

I used packaging tape to cover the front and back,

making a sturdy paper that I could cut my stencil from.

Phew.

Hard part done.

Now I give the boards a wash of brown.

Let it dry.

Paint with a mix of neutral gray and white.

Using the stencil as a guide, fill in with paint.


Here is the pattern for your personal use:


I also painted one in a darker gray

and then brushed provincial stain over the top.


Tucked in behind,

you can see the large 

"Have Yourself a Merry Little Christmas" sign.

I posted about that sign here.


I made a few changes to it this year.

Bright and Happy Signs!


So, you can see I'm having fun

working on some new Christmas and Winter art.

I will have some things at our local craft fair in December.

If you live around Syracuse, Nebraska,

that will be 

Saturday, Dec. 5th 2015
First Bank Basement
9-4


I will post some other new things soon.

Have a great Thanksgiving Week!

Deb


Sharing at:


Saturday, November 7, 2015

Gray and White Chippy Dresser

Sue had a plain old dresser-

white with plastic handles.

Not anymore.


Pin It!
Now it has character

and a great neutral palette

that will be so restful in her master bedroom.

It's so fun to watch it go from

plastic handles:


To personality hardware!

(from Hobby Lobby)


My inspiration piece came from

Kelly at the Lily Pad Cottage


So for this look,

I sprayed the drawer fronts with a black primer

and just the edges of the body of the dresser.


Then I rubbed a wax candle 

randomly onto black drawer fronts

and just the very edges of dresser.

These will be the areas that the paint will resist

and later be sanded to show 

black under tones.


 I painted the dresser white,

lifting my brush at the edges to keep 

some of the black exposed.

I painted the drawer fronts with two coats

of light gray.

I mixed black enamel latex

with Olympic "Crumb Cookie"

to get my gray.

After it is dry, 

sand the edges and drawer fronts with

150 grit sandpaper.

If there is more chippy than you would like,

just touch up those areas with your top coat paint.


Such a fun update!

I was thinking about 

 layering other colors this way.

So many possibilities!

Hope you have some fun furniture updates too,


Deb


sharing at:


Monday, October 19, 2015

Making Wood Planked Pumpkins

Fall calls

for a craft party!


Pin It!
So the family girls gathered

and we made 

planked pumpkin art!


We made the pumpkins

so they can either hang or stand.


Pin It!


They are made from fence pickets

that are only about 3/8" thick.

Here you can see the back.

For this one, I lined up five 13" vertical boards

and connected them with two 13"horizontal boards.

Then I drew my shape on a template 

and traced it onto the boards.

Then cut it out with my jig saw

careful to avoid areas where there are screws.

Using a longer screw, 

I attached the stem.


We put a brown wash on the base

of all of the pumpkins.


Then, yes, the easy peasy part

of using good ole card stock

to drag paints across the wood.

Let your brown wash dry first.


You can see more about 

pulling paint with paper here.

For the oranges, I used these:


Next we had fun with ribbon, raffia,

greenery, and brown curly floral wire.


Pin It!
Some of the girls used metallic!


Pin It!


What a fun fall day!!

Hope you try this with your friends,

Deb


Sharing At: